All by myself this weekend, I sanded our dresser, a little chest of drawers and one nightstand (plus I painted and polyurethaned the dresser and chest of drawers by myself), so when it was time to sand the last nightstand, I was begging Kent to help me. After hemming and hawing for most of the morning, I finally got him out there to sand the last one while I started painting and trying out the antiquing technique on the other nightstand.
Thank goodness he helped-- even if it was reluctantly and kind of a halfway job. Otherwise, I would still be out there.
After I had a few coats of blue paint (I used flat latex) on my nightstand, I started trying to research the antiquing technique. I knew the basic idea because my mom did it to her cabinets, and they look beautiful. She told me about the technique, but I knew nothing about specific products to use, and the Internet was proving to be pretty much useless in helping me. I kept coming up with the general "how to" kind of thing, but nothing really specific at all. Finally, I found one blog that mentioned a potential product brand name, but then I couldn't find anything on exactly how to use it.
Fine, I thought, I'll just go buy the stuff, figure it out, and somehow make it work.
Once I had everything, tried it, and got it looking the way I wanted, I decided to write my own tutorial so maybe it might help someone going through what I went through today, so here it goes.
If you want to do an antique look like the one I did, start with two or three coats of latex paint in the color of your choice. I chose a light blue called Eucalyptus Leaf by Behr because the primer was already in the paint. Let those coats dry completely. ***Let me add that you will want to practice on some scrap wood until you get your technique the way you like it.***
Now comes the antiquing technique.
I used a product by Valspar that was just called Antiquing Glaze. It was in the paint section at Lowe's. It comes in a little container, and looks like it will go a long way.
This is what it looks like.
I wanted my antique look to also be a little distressed-- the way my mom had done her cabinets that I love so much. They are a little banged up and have a little "worm hole" look. If you want this look, make yourself a board of some sort with nails sticking out. You'll use this to literally beat the wood to make "worm holes."
This is what I used...
It's actually the leg of our old broken nightstand that Kent literally ripped off.
I nailed a few nails through the end and voila!
You'll want to bang (fairly gently) in small areas to make little patches, if you will, of "worm holes."
The key to all of this is to make it look natural and irregular. Uniformity is not good for the distressed/antiqued look.
I used a little sanding block thingy... I don't know the technical name.
It looks like this...
Sand a few areas, and try to make it look as natural as possible.
Go easy at first. You don't want to go overboard.
I also literally beat the thing with the wooden stick that held the nails. It added a few more dents and dings.
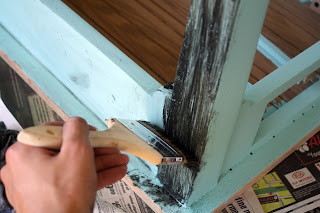
Dip the ends of the bristles in glaze, and start brushing onto the furniture.
Work in small sections. This glaze dries quickly, so you'll have about a 15 minute window to get each section the way you want.
Cover the area you are working on.
I had already experimented and knew mine needed a thicker coating to get to the darkness I wanted, so just experiment yourself and determine if you need just a light coating or a thicker one like me.
Immediately after brushing it on, start wiping with a barely damp cloth.
I used an old t-shirt.
Since I was working on the leg, I just wiped up and down in the direction of the grain.
If you are working on a larger area, you may choose to wipe in a quick circular motion. Just be sure that you can't see the circles in the glaze or you will see them when it's dry.
You may wipe off as much or as little as you want. It's all according to your preference.
So there you have it. That's how you create an antique look on furniture using an antiquing glaze.
I'm going to go finish my nightstands, and I'll show you the finished product as soon as I'm done. :-)
Hope at least someone will find this helpful!


That looks really nice. im gonna try it on my dresser.
ReplyDeleteThank you so much for this information. I love the look and am going to attempt to do my mom's chest of drawers....
ReplyDeleteI had the same problem finding information about doing this so i experimented like you ,i didn't use the brush though, i used the tshirts, you can get a bag of those at Lowe's.,my kitchen cabinets are gorgeous , i found out with me is to go with the same direction of the paint strokes.The glaze works wonders.....
ReplyDeleteI really appreciated your information. I recently did a tall dresser with 12 drawers in Annie Sloan Paint. You never have to sand or prime before painting. I found it on Pinterest. I have some of the Valspar and will use your information on refinishing a small table. Thank you again for sharing!
ReplyDelete